Are you ready to take on an exciting and rewarding DIY project? Do you have a fascination with mechanics and a desire to create something with your hands? If so, learning how to build a go-kart might be your perfect challenge.
Building a go-kart isn’t just about creating a fun and exhilarating ride; it’s also about the sense of accomplishment that comes with constructing something complex and functional from scratch. By the end of this project, you won’t just have a go-kart; you’ll have a testament to your skills, patience, and hard work.
Materials Required for Building a Go-Kart
- Go-Kart Frame Material: Usually, square steel tubing is used for building the go-kart frame.
- Engine: You can use a small engine from a lawnmower or buy a new one. An engine of around 5 to 6.5 horsepower is sufficient for a basic go-kart.
- Axle Kit: This includes the axle, the wheels’ hubs, and the sprocket or brake disc.
- Steering Kit: Consists of a steering shaft, steering wheel, tie rods, and spindles.
- Wheels and Tires: You’ll need four wheels – two for the front and two for the rear.
- Seat: Choose a comfortable seat that fits properly on your go-kart frame.
- Brake and Throttle Systems: Brake and throttle pedals, cables, and springs.
- Chain and Clutch: To transmit power from the engine to the wheels.
- Miscellaneous Hardware: This includes bolts, nuts, washers, split pins, and more to secure everything in place.
- Safety Equipment: Don’t forget a good quality helmet, gloves, and other safety equipment when you’re ready to take your go-kart out for a spin.
Safety should always be your primary concern when building and operating a go-kart. Always use quality components and follow the instructions carefully.
Tools Required for Building a Go-Kart
- Welding Machine: A MIG welder is typically sufficient for a go-kart project. Ensure you have the necessary safety equipment, such as gloves and a welding helmet.
- Angle Grinder: You’ll need this to cut your steel tubing and clean up your welds.
- Drill: A power drill will be needed for various tasks, such as drilling holes for mounting components.
- Set of Wrenches and Sockets: These are essential for tightening and loosening bolts and nuts.
- Screwdrivers: A set of various-sized flathead and Phillips screwdrivers will be necessary.
- Pliers: These can be useful for holding parts, bending metal, and cutting wires.
- Hammer: You’ll find a hammer handy for a variety of tasks.
- Tape Measure and Square: For precise measurements and angles when cutting and mounting parts.
- Safety Equipment: Safety glasses, gloves, and sturdy footwear are recommended to protect yourself during the build.
- Workbench or Table: A solid, flat surface to work on will make the build much easier and safer.
Remember, the key to a successful build is preparation. Make sure you have all the tools and materials ready before you start. Enjoy the process, and stay safe!
Go-Kart Building Steps
Step 1: Design Your Go-Kart
The first step in building a go-kart involves careful planning and design. Before cutting metal or purchasing parts, you must envision what you will build. Consider factors like the size of the driver, the number of passengers, the type of terrain you’ll be riding on, and the type of engine you plan to use. You may also want to decide whether your go-kart will be purely for fun or whether you want to compete in go-kart races.
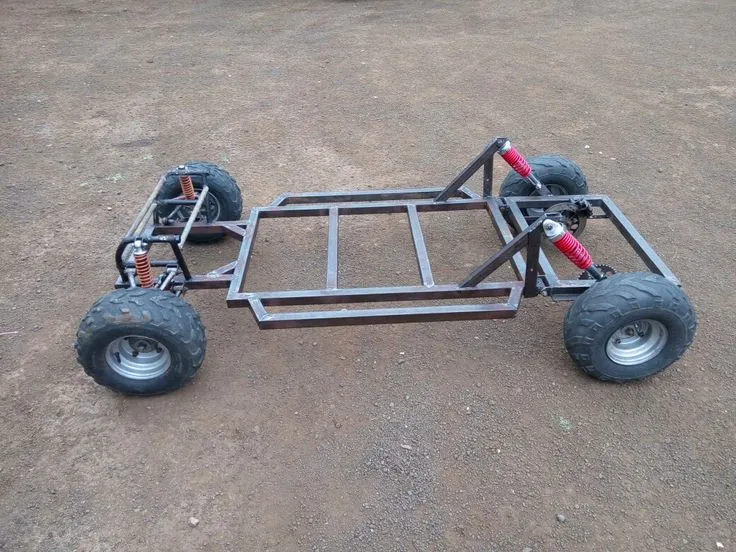
Step 2: Construct the Go-Kart Frame
Next comes the frame – the skeleton of your go-kart. This is where our guide on go-kart frames and materials comes in handy. It’s all about cutting and welding the square steel tubing into the shape of your go-kart’s body. Ensuring your welding is even and secure is vital for the safety and durability of your go-kart. If you don’t have a welder or would prefer not to use one, see our guide on how to build a go-kart without a welder.
Step 3: Install the Rear Axle
The axle is a critical component of your go-kart, serving as the rotating shaft to which the rear wheels and the engine will connect. Ensuring it’s correctly aligned and securely attached to the frame is crucial. For more detailed instructions about go-kart axles, check our go-kart axle kit guide.
Step 4: Mount the Engine
After you’ve installed the axle, it’s time to mount the engine onto the frame. This step requires accuracy, as the engine’s position will directly affect the alignment of the drive chain with the axle. For tips on choosing the right engine for your go-kart, see our guide on go-kart transmissions.
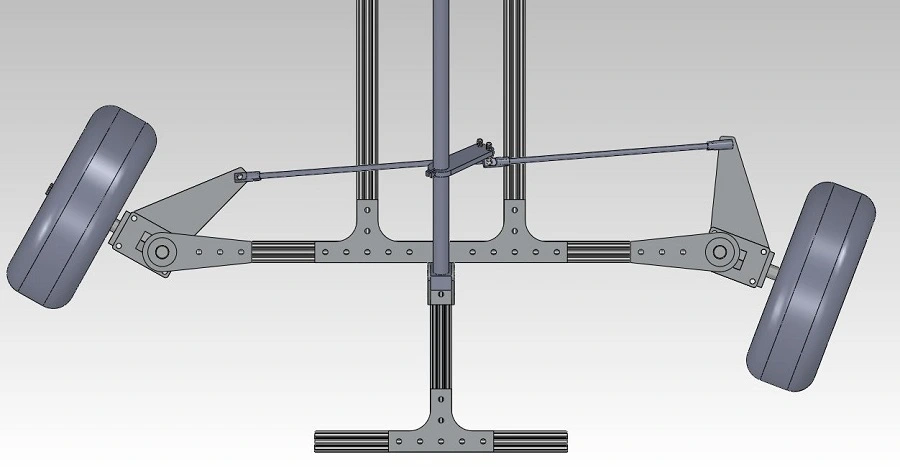
Step 5: Assemble the Steering System
How does go-kart steering work? The steering system, another critical part of your go-kart, allows you to control its direction. It consists of the steering column, tie rods, and spindles. To improve the steering responsiveness of your go-kart, check out our guide on how to improve go-kart steering.
Step 6: Attach the Wheels
Now, it’s time to attach the wheels to your go-kart. The wheels are connected to the spindles on your steering system at the front and the axle at the rear. You must ensure that the wheels are securely fastened and spin freely without wobbling. For more tips on the assembly process, visit our guide on go-kart assembly.
Step 7: Install the Seat
The next step is to install the seat. The seat should be positioned so the driver can easily reach the steering wheel and the pedals. For some, this might involve welding the seat to the frame; bolting the seat may be the better option for others.
Step 8: Install the Brake and Throttle Systems
Following the seat installation, you will install the brake and throttle systems. These systems are crucial for controlling your go-kart’s speed and stopping power. Remember, your safety is paramount, so ensure these systems are set up correctly and responsive. If you’re having trouble with your go-kart’s brake or throttle, you might find our troubleshooting guide helpful.
Step 9: Install the Chain and Centrifugal Clutch
Next, install the clutch onto the engine’s shaft and connect it to the axle using the chain. This step is critical to your go-kart’s operation, as the chain and clutch allow the engine’s power to be transmitted to the wheels. For more information on adjusting your go-kart’s clutch, please read our guide on how to adjust a centrifugal clutch.
Step 10: Perform Safety Checks and Test Drive
Finally, after everything is assembled, double-check all your work to ensure everything is secure. Then, in a controlled and safe environment, perform a test drive. Start slowly and check the steering, brakes, and throttle responsiveness. If you’ve followed the steps carefully and used quality components, your go-kart should be ready for fun and safe riding.
Cost Breakdown
Please note that these costs are approximate and may vary based on location, vendor, and quality of materials. Prices are estimated as of 2023.
- Go-Kart Frame Material (square steel tubing): Depending on the size of your kart, you will need between 12 and 24 feet of tubing. Prices typically range from $2 to $5 per foot. Estimate: $50 – $120.
- Engine (5 to 6.5 horsepower): A small lawnmower engine can be repurposed, but if you’re buying a new one, it could cost between $100 and $300, depending on the brand and horsepower. Estimate: $100 – $300.
- Axle Kit: This kit includes the axle, wheel hubs, and a sprocket or brake disc. Prices can vary greatly based on the quality of the components. Estimate: $80 – $150.
- Steering Kit: The steering kit, which consists of a steering shaft, steering wheel, tie rods, and spindles, may cost between $60 and $120, depending on the brand and quality. Estimate: $60 – $120.
- Wheels and Tires (Set of 4): The cost of wheels and tires will depend on their size and quality. Basic sets can start around $80, while high-performance wheels and tires cost several hundred dollars. Estimate: $80 – $200.
- Seat: Go-kart seats vary in price depending on their design and comfort level. A basic seat could cost around $40, while a high-end, padded seat could cost up to $80 or more. Estimate: $40 – $80.
- Brake and Throttle Systems: These include the brake and throttle pedals, cables, and springs. The price can vary based on the type of brakes and throttle system you choose. Estimate: $30 – $60.
- Chain and Clutch: The chain and clutch transmit power from the engine to the wheels. Prices can vary based on the quality and type of clutch (centrifugal vs. manual). Estimate: $40 – $80.
- Miscellaneous Hardware: This includes nuts, bolts, washers, split pins, and more. Depending on the size and number of these items, costs may vary. Estimate: $20 – $40.
- Safety Equipment: Safety equipment such as a helmet and gloves are necessary for operating the go-kart. These costs can range based on the quality and type of equipment. Estimate: $50 – $150.
Adding up these costs, the total estimated range for building a go-kart can run between $560 and $1200.
Remember that the costs mentioned do not cover the necessary tools for the build, such as a welder, angle grinder, and drill. If you don’t currently own these tools, you should include the cost of buying or renting them in your budget.
Conclusion
Building a go-kart is a rewarding endeavor. This project allows you to explore various aspects of mechanics, from designing the main frame using square tubing to understanding the intricacies of a simple engine. The process of assembling the steering system, connecting the tie rod and steering shaft, and mounting the brake and throttle pedals, provides valuable, hands-on experience.
Choosing the right engine, whether a lawnmower engine or a high horsepower one, and installing it onto the chassis, plays a pivotal role in the performance of your go-kart. Remember to securely attach the centrifugal clutch and axle sprocket to transmit power efficiently to the rear axle.
Finally, as you bolt the seat to the go-kart frame and connect the steering wheel, you’ll be one step closer to experiencing the thrill of karting. Ensure the brake system functions correctly for your safety and others around you. Once completed, you will have a functional go-kart and the pride of having built it yourself.
Thank you very much for taking this journey with us, and we wish you the best of luck in your go-kart-building adventure!
Frequently Asked Questions
Most DIY go-karts, especially those using lawnmowers or small utility engines, run on regular unleaded gasoline. However, it’s always best to check the engine specifications you are using.
The time required to build a go-kart can vary widely depending on your skill level, the complexity of your design, and the amount of time you can dedicate to the project. For a basic go-kart, you might expect it to take anywhere from a few days to a few weeks.
You do not need a special license to drive a go-kart on private property in most places. However, if you plan to drive the go-kart on public roads or public areas, you should check the local laws in your area, as a special permit or license may be required.

Goran, an experienced go-kart racer, fuels GoKartLife.com with his passion and expertise. He offers valuable insights and tips for fellow enthusiasts, fostering the growth of the go-kart community. Join Goran at GoKartLife.com and immerse yourself in this exhilarating sport.