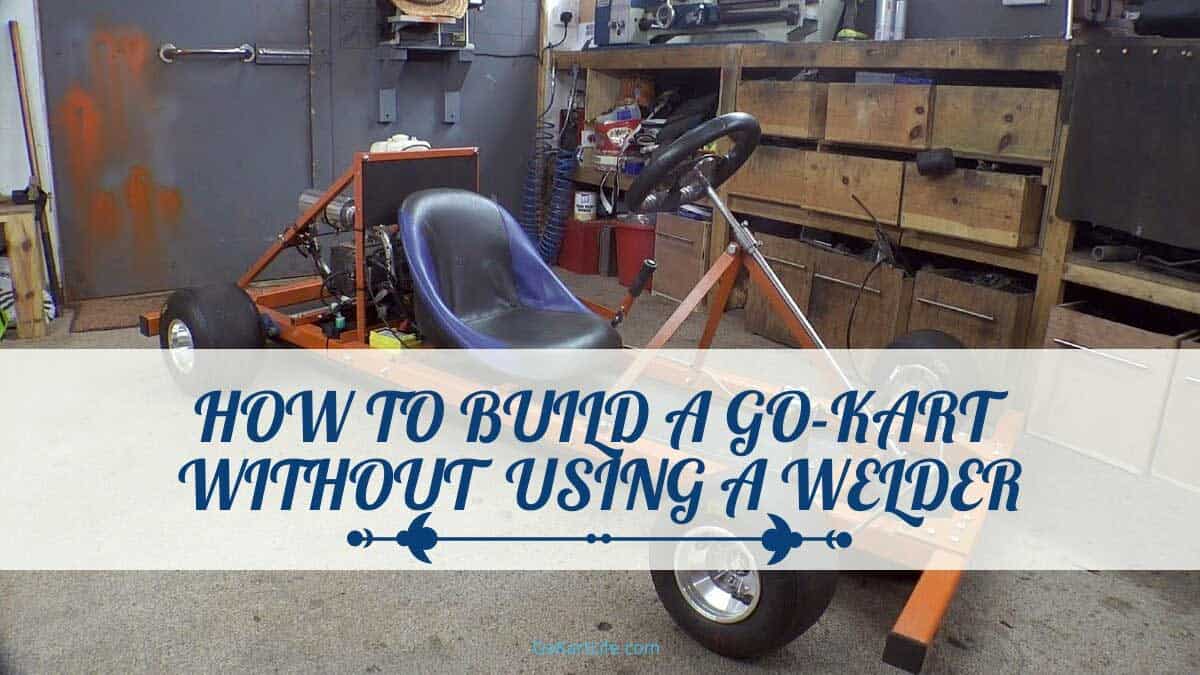
Building a go-kart is not the most challenging motorized vehicle, but it becomes a lot more challenging when you aren’t using a welder. However, it can be done without a welder, and you will work with basic tools that you may already have in your workshop.
To build a go-kart without a welder, you will need a few items and tools to help make it happen. We’ll show you that in a few easy steps, you can have a new go-kart ready to race around the yard in just 24 hours if you have the motivation and determination!
Steps to Build a Go-Kart:
- Design the Go-kart
- Build a Jig
- Make a Frame
- Attach the Axles
- Build and Attach a Seat
- Place the Engine
- Mount Handlebars
- Test Drive!
Design the Go-Kart Specific to Your Liking
To create a go-kart that you want to ride more than once, you must draw it out first. Even if you are not the most artistic, drawing a few straight lines will help you have the proper dimensions and angles for your new ride. Before drawing out your design, you should answer these few questions to help you get started:
- What type of go-kart is it going to be?
- How big do you want the go-kart?
- How wide?
- How tall are you?
- How many people is it going to sit?
- What kind of engine is it going to have?
- What safety features are necessary?
Once you have answered those, you will better understand what you want your go-kart to look like! You will then draw out the specific model and start preparing the necessary tools and materials.
I recommend that you begin drawing the model out on a copy printer-sized paper for modifications and mistakes to be made and then finalize, transferring it to 18” x 24” or larger to have a true-to-size design.
Building a Jig Will Help with the Frame
Once you have created the design on paper, you can start to build the jig. First, you should have a handful of these tools and materials:
- Axels
- Brakes
- Clutches/Handlebars
- Throttle and Brake Cables
- Sprockets
- Chains
- Steering Wheel
- Wheels/Rims and Spacers
- A Drill and Drill Bits
- Bolts
- Lock Nuts
- Plates
- Your Choice of Metal (Tapco Pole, Square Tubing)
- Plywood
If you have at least 80% of those materials, you can officially start your at-home invention!
After gathering your equipment, take a large piece of plywood that you have measured to fit your desired size and place your true-to-size design over the top.
Using a hacksaw or any tool that you think suffices, cut an outline of your frame with 1” x 2” of metal. (If you are making a go-kart from wood, use the same size of everything we describe only with your choice of wood.) Screw down all of the poles into the plywood and step back to admire your new jig!
Make the Frame Right the First Time
I recommend you be fully satisfied with how big or small you want your frame to ensure you will enjoy riding this new go-kart. Making a frame that is not comfortable in the end will not entice you to ride.
Also, very important, I recommend that you take your time to make the chassis, as this will keep you safe and your go-kart stable.
With your choice of metal, cut 1 ¼” steep to create a frame that will go inside or on top of the jig. Use a hacksaw or handsaw to cut right angles, and use plates if needed. Drill from the bottom up to attach your pieces.
You should now have a rectangular shape created with both the jig and the frame. Be sure to use a tape measure and cross-diagonal check everything.
Attach the Axles One at a Time
Once your frame is ready to rock, we can move on to the axles. The axles will be where your steering comes in, as this is where your tires sit. Get started by dodging this common mistake and putting the axle on the frame’s bottom!
Begin with the rear axle, having it as far back as possible, and drill holes through the frame to attach the axle blocks to the frame with bolts. Again, drill from the undercarriage up and tighten with a lock nut.
After the rear axle is in place, put the rear wheels on. If you don’t have your wheels picked out yet, check out Go Power Sports to find the proper wheel and tire for your go-kart.
If you can’t decide or don’t know how to pick the tire size, check out How to Read Go-Kart Tire Sizes Guide.
With whatever wheel you decide on, you will probably still have to add spacers and washers in between the axle and the tire.
If you use wood, your go-kart might rattle as wood stretches over time. We recommend adding two or more washers to ensure they will stay tight and secure.
Once the rear axle and wheels are on and sturdy, follow the same directions to mount the front axle and wheels. If necessary, bend or tilt the wheel frame a little to ensure the wheels are straight and flat on the ground.
Related Article: Best Go-Kart Axle Kit For An Afternoon Project
Build a Seat That is Both Efficient and Comfortable
Very similar to the first step, draw out how you want your seat to look. Map out exactly where you want it on the cart and the dimensions for how many persons will be able to fit. You do have some freedom with the seat, angling it to lean back some or bolting down a lawn mower seat to save money and reuse already owned materials!
If you plan to make your seat, cut it out of some heavy-duty metal, steel, or wood. Whatever piece you chose, measure and cut 2” x 4” and drill holes from the seat bottom into the frame. Use 90-degree angle brackets to hold the back up and get creative by adding two bolstering pieces on the sides as armrests.
Buy and Place the Engine Appropriately
Depending on how experienced you are in riding, go-karts will help you decide on the best engine to purchase. We recommend buying a Predator 212 for any skill level as it is very user-friendly and easy to operate.

- Durable cast iron cylinder withstands wear and abuse
- User-friendly controls for easy starting and operation
- Recoil start
Once your engine is picked out and ready to mount, it’s time to return to the drawing board! Ensure all your measurements and dimensions allow you to place the sized engine you purchased. Put a straight edge against the sprocket to ensure it is appropriately aligned with the frame.
If your cart is at an angle, mount the front of the engine slightly higher. Mark the holes to match the engine with the frame and drill it out.
Following the engine’s mounting, you will mount the chain and the torque converter. First, place the torque converter on top of the engine and bolt them together using washers and lock nuts to get enough space and to keep it nice and tight.
Put the chain on the engine with the clip facing away from it, and with the chain facing that direction, it will turn the most. Tighten the chain and drill down with bolts. If the chain is too long, you can shorten it with a hammer and then punch where the hole is. We advise that you make the chain as short as possible.
Related Article: Go-Kart Horsepower – How Much Horsepower Is Enough
Mount the Handlebars Properly if You Want to Steer Properly
You are almost finished and ready to ride, but first, you need some handlebars to ensure you can steer toward where you intend to go! You can either purchase a steering wheel or regular handlebars. Either way, you will need throttle and brake cables.
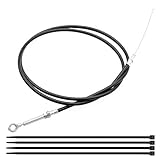
- [NOTICE BEFORE ORDERING]: Suitable for 8252-1390 Manco ASW Go Kart Go Cart.Please ensure this part fits for your motorcycle BEFORE PURCHASE.
- [DIMENSIONS]:71'' TOTAL LENGTH , included 63'' CASING LENGTH.
- [TOP QUALITY]:Made of high quality metal,which is non toxic,no odor and durable.The Chrome color cable head is the original heavy duty one, very strong .
Connect two pieces of your chosen metal or wood and make an upward base to hold your steering device. Attach the brake cable from the handlebar to the chain to ensure your brakes work.
If needed, make a rod that goes from the level of the caliper to the brake handle. Pull the cables just to the point of tension. On the other side of the handlebars, connect the gas throttle cable that links back to the engine.
For safety purposes, mount a kill switch and lead the cable to the engine. You can even make the kill switch a bracelet in case of a flip or you fall out.
Time to Hit the Road!
Now that you have designed and built your go-kart, it’s time to make it custom and get it on the road! To make it custom, you can add paint to the base attached to the handlebars. Always prime the area first and then apply paint.
Once you have everything set in place, screwed in tight, and painted like your own Hot Wheelz, it’s time to take it for a spin around the block! Make sure to put the right oil and gas in the engine, and always let the engine warm up before taking off.
I recommend you start slow and get a feel for the cart beforehand if minor adjustments are needed. Answer these few questions after your first test drive to make sure your go-kart is ready for some real action:
- Did the chain pop off?
- Is the steering too tight or loose?
- Is the cart taking corners well?
- Are the brakes lagging or stuttering?
- Is the kart able to handle extended periods of running?
You can always tweak or make a better go-kart; therefore, be prepared to change something. If there is a problem, identify it and fix it before getting back out there. Always put your safety first, which includes having a properly running go-kart.
Have Fun in Your New Go-Kart
Well done on making your new go-kart! Always be prepared safety-wise in case something doesn’t go as planned. Consider wearing a helmet and attaching a seatbelt to the seat. Regardless, we hope you had fun learning the steps of building a go-kart, and don’t forget that trial and error are always a part of the process.

Goran, an experienced go-kart racer, fuels GoKartLife.com with his passion and expertise. He offers valuable insights and tips for fellow enthusiasts, fostering the growth of the go-kart community. Join Goran at GoKartLife.com and immerse yourself in this exhilarating sport.
